Tricks of the Trade: How to get a Tight Car Seat Installation with Ease


One of the most common complaints that I hear from caregivers is how much they struggle to get a tight car seat installation.  Many caregivers feel as though they’re physically unable to do it, despite not necessarily having any physical limitations.  Installing a car seat can feel intimidating and overwhelming.  However, contrary to popular belief, getting the car seat installed correctly has very little to do with brute strength, and almost everything to do with leverage.  While every car seat and vehicle is different – and have their own subtle nuances – I’m going to share some of my favorite tricks which work well for most configurations.

Since leverage is one of your biggest allies, you want to take full advantage of it.  Most of the time that will mean that you want to pull the slack both toward you and parallel to the belt path of the car seat.

Pulling the lower anchor “tail” from inside of the actual belt path, parallel to the rest of the rest of the lower anchor strap, often makes installation much easier.

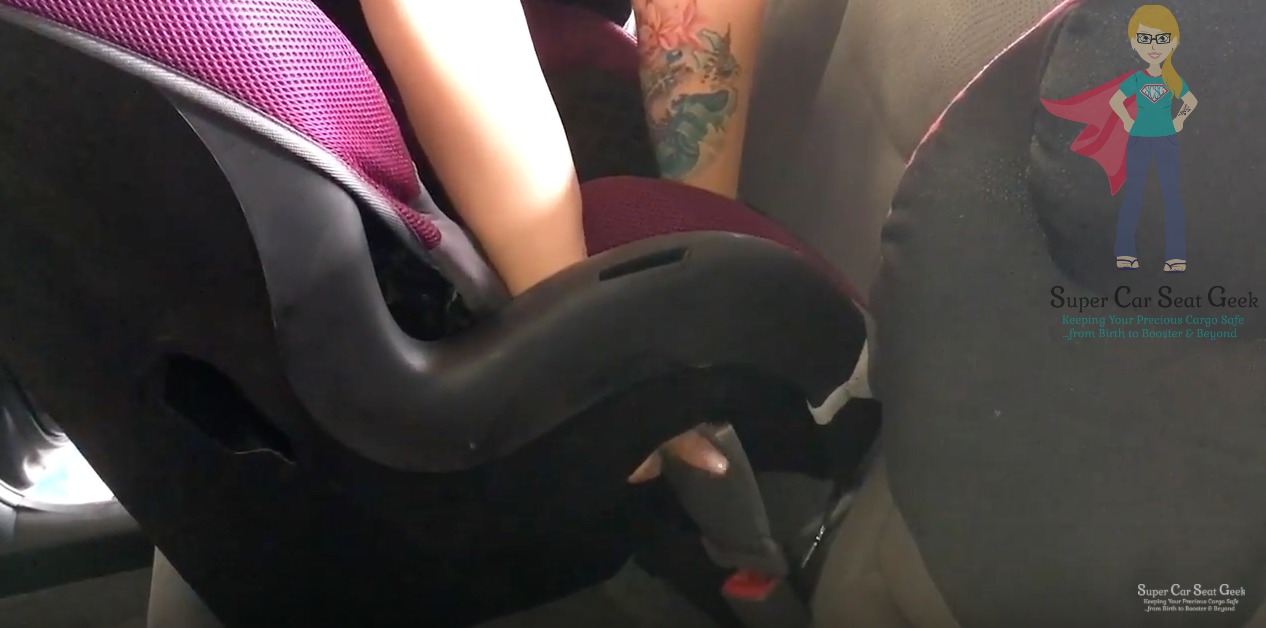
For example, if you’re installing a car seat using lower anchors (LATCH), you’ll want to look to see where the adjuster is on the lower anchor strap.  It will be on the same side of the strap where the “tail” of the strap is located.  Most of the time, I find that caregivers will grab ahold of the tail on the outside of the seat and try to tighten it by pulling it away from the car seat.  While this seems perfectly logical, this does not utilize the available leverage very effectively.  Instead, when possible, you’ll want to position yourself on the opposite side of the car seat that the adjuster piece is located on so that you can pull that “tail” toward you, parallel to the belt path of the car seat.  For even better leverage, try pulling the strap inside of the  car seat’s belt path and pulling from there.  Many times this can be accomplished by pulling the cover of the car seat back at the belt path, and pulling the tail inside of the belt path.  After the seat is installed tightly, simply replace and re-secure the cover.

Pulling the shoulder belt from inside of the actual belt path, parallel to the lap belt, often makes installation much easier.

Installing a car seat with a seat belt is very similar.  You can often utilize the same method, but instead of pulling on the lower anchor strap’s “tail”, you’ll be pulling the vehicle shoulder belt toward you, over the car seat’s belt path, to better remove all of the slack from the lap belt portion of the seat belt.  (Don’t forget to check your manuals for instructions on how to lock the seat belt.)

Remember to only check for movement directly at the applicable belt path on the car seat, and only by using about the same amount of force with which you would use to give somebody a firm handshake.  If the car seat moves 1” or less directly at the appropriate belt path, then the car seat is installed tightly.  If it’s moving more than that, then repeat the steps above.

Before you install your car seat, please be sure to consult your child safety seat’s owner’s manual for seat-specific installation instructions, as well as your vehicle owner’s manual for vehicle-specific installation instructions.  And of course, don’t forget to schedule a seat check with a certified Child Passenger Safety Technician.

Advertisement

Harness Heights: Finding the Right Fit


Kids sure have a way of sprouting up overnight at times, don’t they?  Sometimes it can happen so quickly that we don’t even realize how much they’ve grown until we happen to catch a glimpse of them a certain way.  Just like clothing sizes need to be adjusted as a child grows, a child’s car seat also needs to be adjusted in various ways to accommodate their growth. 

Every car seat is different, and each one has different rules when it comes to adjusting the harness, the buckle, removing inserts, etc so it’s critical to review your manual periodically.  This article will specifically address how and when to adjust the height of the harness.

The vast majority of car seat harnesses will adjust for height in one of two ways.—They’ll either have a “traditional rethread” harness, or they’ll have a “no rethread harness”.  Again, please review your manual for your specific seat.

Traditional Rethread Harness: Car seats with this style harness will have various slots in the shell (frame) of the car seat which the harness is threaded through, and a metal piece called a splitter plate to which the harness is secured.  The splitter plate is attached to one end of the harness adjuster “tail”, which comes through the bottom, front of the car seat and is what is pulled on to tighten the child’s harness. 

Splitter Plate watermarked
On car seats with a “traditional rethread harness”, the harness must be attached to the Splitter Plate, shown here.


To decipher where the harness should be, one needs to look at where the child’s shoulders are in reference to the harness slots, and take into account whether the child is rear facing or forward facing.  (Remember: Any time that a child is rear facing, the harness must be level with, or below the child’s shoulders; when they’re forward facing, the harness needs to be level with or above the child’s shoulders.  Additionally, some car seats have restrictions on which harness slots may be used for each direction so again, it’s critical that you refer to the owner’s manual for the seat.) 
Often the easiest way to adjust the height of the harness is to uninstall the car seat, loosen the harness a bit, and turn the car seat over so that you’re looking at the back of it.  Slide one side of the harness off of the splitter plate and pull the strap through the front of the car seat.  Ensure that there are no twists in the strap and then route the harness strap through the appropriate slot, taking care to place it through the same layer of fabric/padding as the shell of the car seat.   Fully re-attach the harness strap to the splitter plate as specified in the manual.  Repeat for the other strap, ensuring that both straps are at the same height.  After the seat is re-installed, double check that the harness is now at the appropriate height for the child.  If you’re unsure if it’s at the correct height, a helpful tip is to place a butter knife or popsicle stick on the child’s shoulders and see where the tip is in relation to the harness slots.

Proper harness height rf vs ff
Using the correct harness height is key factor in the proper use of your child’s safety seat.

Pro Tip: The harness should always be at the closest slot to the child’s shoulders which is also appropriate for the direction in which they face. 

No Rethread Harness: Car seats with this type of harness often adjust by squeezing a handle at the top of the head rest, and pulling the headrest up/pushing the headrest down.  As the headrest height changes, so does the harness height.  Frequently, this type of harness can be adjusted without having to uninstall the car seat. 

No Rethread Harness watermarked
Car seats which have a “no rethread harness” often adjust by squeezing a handle at the top of a head rest.


Sometimes it can be difficult to gauge exactly where the harness is in relation to the child’s shoulders.  Since this style car seat doesn’t have harness slots, the “popsicle stick test” described above isn’t as useful.  Instead, what I often advise caregivers to look for is how the harness looks on the shoulders themselves.—Is the harness curving over/around the shoulders (which is what we’d look for when a child is rear facing), or is it angling upward by the child’s shoulders (which is what we’d look for when a child is forward facing)? 
After the harness is adjusted to the appropriate height, the caregiver should ensure that the head rest is locked into place so that it’s not “between” adjustment settings. 

These are only two examples out of many.  The car seat which you have may adjust in a different way altogether.  The car seat manual will always explain how and when to make adjustments.  If further clarification is needed, caregivers can contact the car seat manufacturer directly.  Meeting with a certified Child Passenger Safety Technician is the best way to ensure that your child’s seat is not only adjusted correctly, but installed correctly as well.  You can schedule an appointment with Super Car Seat Geek via Facebook, email, or the “Contact Us” portion of the website.

Five Quick Tips to Keep Your Precious Cargo Safe in the Car

The responsibilities that come with parenthood can be overwhelming at times.  There are so many different things to learn and frequently, when you feel like you’ve finally mastered one thing, something changes, and you need to re-learn it.

Protecting your child in the car is one of the many things that we parents must learn how to do.  Most of us get in and out of the car multiple times a day.  It is a mundane task, so we take it for granted, forgetting that there are inherent risks in and around the car.  Parents today have busy lives and countless things to do and remember.  We are usually running around, trying desperately to get from Point A to Point B safely and on time.  It’s easy to forget the many risks we face each time we climb into the car.  The fact however, remains that car crashes are the leading cause of death for children in the U.S.  Most parents feel like their child is in the correct car seat and that their car seat is installed and used correctly, but one study has shown a misuse rate of as high as 92%¹.

While I certainly can’t cover everything there is to know about child passenger safety in one brief article, I’m going to share some basic tips which  are easy to implement right now.  Please contact me if you have further questions or would like to schedule an appointment to have your child’s car seat or booster checked.

1) Harness Placement

When a child is rear facing, the harness (car seat straps) should be coming out of the car seat directly at, or below the child’s shoulders. (Remember, a child should be rear facing until they are at least two years old.)

When a child is forward facing, the harness should be coming from at or above a child’s shoulders. (Remember, a child should be harnessed until they are at least five years old.)

2) Pinch Test

Ensure that the harness is flat and straight, with no twists , and then remove all of the slack .  Pay special attention to ensure that there’s no slack “hiding” down by the child’s hips.  The harness will be snug enough when it passes “the pinch test,” meaning that you’re unable to pinch a fold in the harness at the child’s shoulders/collarbone.  

3) Chest Clip Placement

The harness retainer clip (more commonly referred to as the chest clip) should always be directly on top of the child’s sternum (breast bone).  The top of it should be aligned with the child’s armpits.

4) Inch Test

The proper way check that the car seat is installed tightly, is is to grab the seat directly, and only at the belt path, and give it a wiggle with about the same force as you’d use in a firm handshake.  The car seat should not move more than 1” in any direction at the belt path. (If the seat is installed rear facing, the belt path will be under the child’s feet/lower legs.  If the car seat is installed forward facing, the belt path will be behind the child’s back.)  Remember—if the car seat is forward facing, you’ll also want to secure the tether strap to the designated tether anchor for that seating position, and remove all of the slack from the tether strap.

5) Read Your Manuals

Your child’s safety seat can’t do its job if it’s not used correctly.  Every car seat will have different rules for how and when to make adjustments to the harness, buckle, padding, etc.  The manual will tell you precisely how to install the safety seat depending on the vehicle, the location in the vehicle the weight of the child.   It is critical to read the manual for your child’s seat as well as the child safety seat section in your vehicle’s manual. I strongly recommend re-reading your manual periodically, especially when you need to uninstall, clean, make adjustments or reinstall the seat.  If you’re confused about something, you can reach out to a Child Passenger Safety Technician (CPST) such as myself for clarification, or to the car seat manufacturer.

While there are many things to be aware of and to learn, my job as a CPST is to help you keep your child safe.  Nothing makes me happier than helping caregivers feel empowered in their abilities to do that.  I offer a variety of services to assist in every aspect of this journey.  Super Car Seat Geek’s exclusive Concierge Service will help pair you with the very best car seat options for your particular child, vehicle and budget.  Since the right seat is only a fraction of the equation, a private Car Seat Check will ensure that you understand how to install and use your child’s seat correctly every time they get buckled up.  

If you have questions or would like to set up a Concierge Service session, or a private Seat Check, please contact me at facebook.com/SuperCarSeatGeek or email me at SuperCarSeatGeek@gmail.com

¹https://aap.confex.com/aap/2014/webprogrampreliminary/Paper25919.html